Footcare Guides
Postoperative Instructions for Foot Surgery
Following these guidelines will reduce the risk of complications.
- Keep the bandages clean, dry and intact. Do not get them wet. If they get wet, please notify us at once.
- Keep your foot elevated above your heart whenever sitting or lying down.
- Apply ice to the top of the foot/ankle for 20 minutes, three times per day for one week following the surgery. If you have a cast, apply the ice behind your knee.
- Take the pain medications as instructed. Please take the prescribed pain medication when you arrive home from the surgery with a light meal. (example: tea and toast). Then take the pain medication as directed on the bottle.
- Move your ankle up and down for one minute several times a day. This is to prevent leg cramping. If you are in cast please disregard this.
- Weight-bearing Instructions: Keep all walking to a minimum
- Keep surgical shoe on at all times when full weight bearing or walking. Do not walk anywhere without the surgical shoe on. Partial weight with assistance of crutches / walker. This means you may put some pressure on the heel, but not full weight on the foot. Use the crutches / walker with all walking. No weight at all to the foot/ankle of the surgery. Please use crutches / wheelchair to stay off the foot/ankle of the surgery. Do not be alarmed if there is some bleeding through the outer bandage. Expect some minor seepage. If the whole bandage becomes bright red call us immediately.
- Drink Plenty of fluids and follow a low-salt diet for a few days following surgery.
- Resume you normal medication schedule unless modified by us or your medical doctor.
- Please call if you have any questions. During office hours call (877) 747-3668.
CLICK HERETO PRINT THIS GUIDE
Postoperative Wart Surgery
Following these guidelines will reduce the risk of complications.
- Please have all prescriptions filled today.
- Take pain medication as directed before numbness wears off.
- The morning after the surgery take pain medicine 30 minutes prior to dressing change.
- Soak entire foot with dressing in a warm water foot bath with 4 ounces of vinegar in it.
- Soak for 10 minutes and then remove the dressing and soak again.
- Fill site of wart removal with prescribed Silvadene cream. Then apply a gauze dressing.
- Every following morning remove dressing, soak foot, apply cream and apply gauze dressing. Continue until Dr. Sowell says to stop or until wound no longer drains.
- Please attend all post operative appointments.
- Wear shoes and be active to your level of tolerance. Returning to normal activity in 1 to 2 days is normal.
- Please call if you have any questions. During office hours call (877) 747-3668.
CLICK HERETO PRINT THIS GUIDE
Postoperative Toenail Surgery
Following these guidelines will reduce the risk of complications.
- Please have all prescriptions filled today.
- Take pain medication as directed before numbness wears off.
- The morning after the surgery take pain medicine 30 minutes prior to dressing change.
- Soak entire foot with dressing in a warm water foot bath with 4 ounces of vinegar in it.
- Soak for 10 minutes and then remove the dressing and soak again.
- Fill site of wart removal with prescribed Silvadene cream. Then apply a gauze dressing.
- Every following morning remove dressing, soak foot, apply cream and apply gauze dressing. Continue until Dr. Sowell says to stop or until wound no longer drains.
- Please attend all post operative appointments.
- Wear shoes and be active to your level of tolerance. Returning to normal activity in 1 to 2 days is normal.
- Please call if you have any questions. During office hours call (877) 747-3668.
CLICK HERETO PRINT THIS GUIDE
Foot Risk Level
|
||||||||||||||||||||||
|---|---|---|---|---|---|---|---|---|---|---|---|---|---|---|---|---|---|---|---|---|---|---|
| |
||||||||||||||||||||||
|
||||||||||||||||||||||
| |
||||||||||||||||||||||
|
||||||||||||||||||||||
|
CLICK HERE TO PRINT THIS GUIDE
Wearing Orthotics Guide
You have just received your new functional orthotics. These represent the most advanced scientific concept in functional foot care. They are multi-purpose devices for most people.
It may take approximately 1-6 weeks for you to become accustomed to wearing these orthotics. During this adjustment period, there may be some discomfort in the form of foot or leg cramping or direct irritation to the skin. To minimize discomfort, the following instructions will be helpful:
- Wear the orthotics for 1-2 walking hours the first day,2-3 hours the second day, 3-4 hours the third day, 4-5 hours the fourth day, and so on so that by the end of the first week, you are wearing the orthotics seven hours per day. — Children usually adapt more rapidly than adults. Note however that this program is not necessarily strict. You may prefer to divide the wearing time during the day. Do not be discouraged if your adjustment period is longer than the aforementioned schedule.
- The orthotics should be worn with some type of stocking during the break-in period to minimize skin irritation.
- If the orthotics squeak in the shoes, sprinkle a small amount of ordinary talcum powder in the shoes.
- The orthotics may be cleaned with soap and lukewarm water. Do not use extremely hot water or-they will-be damaged.
- If the orthotics or stabilizing device (post) on the bottom are broken or damaged, notify the office as soon as possible.
- You should use a closed heel flat shoe or athletic shoe with this device. For specialty sport-activity; you may need a modified device.
- Please call the office if you have any difficulties or questions about the use or care of these orthotics (877) 747-3668.
CLICK HERE TO PRINT THIS GUIDE
Diabetes Health
Sowell Podiatry takes diabetes very seriously. Of course we want to care for your feet but we also want you to live active healthy lifestyles. Please read this booklet for help in managing our diabetes.
Step 1: Learn about diabetes.
Diabetes means that your blood glucose (blood sugar) is too high. There are two main types of diabetes.
- Type 1 diabetes – the body does not make insulin. Insulin helps the body use glucose from food for energy. People with type 1 need to take insulin every day.
- Type 2 diabetes – the body does not make or use insulin well. People with type 2 often need to take pills or insulin. Type 2 is the most common form of diabetes.
- Gestational diabetes – occurs in some women when they become pregnant. It raises her future risk of developing diabetes, mostly type 2. It may raise her child’s risk of being overweight and developing type 2 diabetes.
Diabetes is serious.
You may have heard people say they have “a touch of diabetes” or that their “sugar is a little high.” These words suggest that diabetes is not a serious disease. That is not correct. Diabetes is serious, but you can learn to manage it!
It’s not easy, but it’s worth it!
All people with diabetes need to make healthy food choices, stay at a healthy weight, and move more every day. Taking good care of yourself and your diabetes can help you feel better. It may help you avoid health problems caused by diabetes such as:
- heart attack and stroke
- eye problems that can lead to trouble seeing or going blind
- nerve damage that can cause your hands and feet to hurt, tingle, or feel numb. Some people may even lose a foot or a leg.
- kidney problems that can cause your kidneys to stop working
- gum disease and loss of teeth
When your blood glucose is close to normal you are likely to
- have more energy.
- be less tired and thirsty and urinate less often.
- heal better and have fewer skin, or bladder infections.
- have fewer problems with your eyesight, feet, and gums.
Step 2: Know your diabetes ABCs.
Talk to your health care team about how to manage your A1C, Blood pressure, and Cholesterol. This can help lower your chances of having a heart attack, stroke, or other diabetes problems. Here’s what the ABCs of diabetes stand for:
• A for the A1C test (A-one-C)*
It shows what your blood glucose has been over the last three months. The A1C goal for many people is below 7. High blood glucose can harm your heart and blood vessels, kidneys, feet, and eyes.
*An A1C of less than 7 is the goal for many people but not for everyone. Talk to your health care team about what A1C target is right for you.
• B for Blood pressure.
The goal for most people with diabetes is below 130/80.
High blood pressure makes your heart work too hard. It can cause heart attack, stroke, and kidney disease.
• C for Cholesterol.
- The LDL goal for people with diabetes is below 100.
- The HDL goal for men with diabetes is above 40.
- The HDL goal for women with diabetes is about 50.
- LDL or “bad” cholesterol can build up and clog your blood vessels. It can cause a heart attack or a stroke. HDL or “good” cholesterol helps remove cholesterol from your blood vessels.
Step 3: Manage your diabetes.
Many people avoid the long-term problems of diabetes by taking good care of themselves. Work with your health care team to reach your ABC target. Use this self-care plan:
- Follow your diabetes meal plan. If you do not have one, ask your health care team to help you develop a meal plan.
- Eat healthy foods such as fruits and vegetables, fish, lean meats, chicken or turkey without the skin, dry peas or beans, whole grains, and low-fat or skim milk and cheese.
- Keep fish and lean meat and poultry portions to about 3 ounces (or the size of a deck of cards). Bake, broil, or grill it.
- Eat foods that have less fat and salt.
- Eat foods with more fiber such as whole grain cereals, breads, crackers, rice, or pasta.
- Get 30 to 60 minutes of physical activity on most days of the week. Brisk walking is a great way to move more.
- Stay at a healthy weight by using your meal plan and moving more.
- Ask for help if you feel down. A mental health counselor, support group, member of the clergy, friend, or family member who will listen to your concerns may help you feel better.
- Learn to cope with stress. Stress can raise your blood glucose. While it is hard to remove stress from your life, you can learn to handle it.
- Stop smoking. Ask for help to quit.
- Take medicines even when you feel good. Ask your doctor if you need aspirin to prevent a heart attack or stroke. Tell your doctor if you cannot afford your medicines or if you have any side effects.
- Check your feet every day for cuts, blisters, red spots, and swelling. Call your podiatrist right away about any sores that do not go away.
- Brush your teeth and floss every day to avoid problems with your mouth, teeth, or gums
- Check your blood glucose. You may want to test it one or more times a day. Keep a record of your blood glucose numbers. Be sure to show it to your health care team.
- Check your blood pressure if your doctor advises.
- Report any changes in your eyesight to your health care team.
Step 4: Get routine care.
See your health care team to find and treat any problems early.
Twice each visit be sure you have a:
- blood pressure check
- foot check
- weight check
- review of your self-care plan shown in Step 3
- A1C test – it may be checked more often if it is over 7
Once each year be sure you have a:
- cholesterol test
- triglyceride test – a type of blood fat
- complete foot exam
- dental exam to check teeth and gums – tell your dentist you have diabetes
- dilated eye exam to check for eye problems
- flu shot
- urine and a blood test to check for kidney problems
At least once get a:
- pneumonia (nu-mo-nya) shot
CLICK HERE TO PRINT THIS GUIDE
Diabetic Foot
If you are diabetic the best way to know how to care for your feet is to see a podiatrist and after he has determined your level and type of foot risk, follow his instructions. In my office, diabetic foot evaluations end with each patient getting specific instructions on how to care for their feet.
General Care and Hygiene
- Never go barefoot either indoors. Your feet may be numb and you will not feel an injury as it occurs.
- Inspect your feet daily. You may use a mirror to help see the soles of your feet and between toes. Check for breaks in skin, dryness and redness. Ask a friend or family member for help if needed.
- Wash your feet daily and be sure to dry between your toes. Water should be warm, test with your elbow to see if it is too hot.
- For dry feet you may apply a thin coat of moisturizing cream but do not put any between your toes.
- If your feet are cold you may wear loose socks to bed. If your feet are hot DO NOT ice them down. Avoid extreme temperatures.
- Cut toenails straight across and do not cut down into the corners.
- Never cut corns or calluses yourself and do not use commercial corn or callus removers.
- Do not use adhesive tape on your feet.
- Avoid any tight clothing or under garments that might constricts feet, legs or hips.
Physician Communication
- Be sure to see your doctor every 3-4 months. Make sure every doctor you see knows you are diabetic.
- See your podiatrist annually, if you are at higher risk you will need to see your podiatrist more often.
- See your podiatrist promptly if you develop a blister, puncture wound, sore, corn, callus or ingrown toenail. Any bleeding, pus or redness are reasons to see your podiatrist.
Footwear
- Buy only comfortable well fitting shoes. Get help with the fitting and be sure to walk around in them before you buy. Buy shoes late in the day when swelling is more likely to be present.
- Softer leather uppers with plenty of width and toe depth make a good choice.
- Avoid open toes or heels and inspect shoes for rough areas, protruding nails and foreign objects before buying.
- Break in new shoes by wearing them for less than two at a time until you know they will not cause blisters.
- Never wear socks or hosiery with seams. Seams can cause pressure areas and cause skin to break down.
- Wear only clean socks and change them daily. Inspect them before putting them on.
PLEASE GO TO THE DIABETIC PORTAL FOR MORE INFORMATION ON DIABETES AND YOUR FEET.
CLICK HERE TO PRINT THIS GUIDE
Plantar Fasciitis Stretching
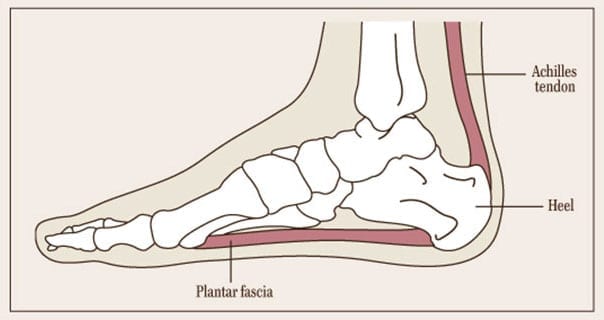
Your heel pain is caused by a traction injury with some inflammation of the tissues of the heel and the underside of the foot. Usually patients have a flat foot, i.e. loss of the instep (long arch of the foot). The treatment is aimed at relieving your pain and restoring this arch.
Patients often find that trainers or similar shoes give the most relief. These shoes are shock absorbing and have an arch support. You have been supplied with a pair of Sorbothane arch supports with heel pads (cushioning insoles). These should be transferred to all your shoes/boots – even your slippers. If you have a problem with only one heel please use both insoles. Please do not walk around in bare feet.
It is important to do stretching exercises for both your Achilles tendon and your plantar fascia. Please try to perform the exercises overleaf at least twice a day as this will speed the healing process and reduce the pain more quickly.
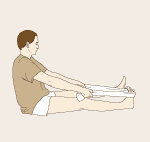
1) Achilles tendon and plantar fascia stretch
First thing in the morning, loop a towel, a piece of elastic or a belt around the ball of your foot and, keeping your knee straight, pull your toes towards your nose, holding for 30 seconds. Repeat 3 times for each foot. Use your arms and shoulders!
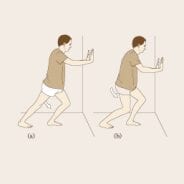
2) Wall push-ups or stretches for Achilles tendon
The Achilles tendon comes from the muscles at the back of your thigh and your calf muscles. These exercises need to be performed first with the knee straight and then with the knee bent in order to stretch both parts of the Achilles tendon. Twice a day do the following wall push-ups or stretches: (a) Face the wall, put both hands on the wall at shoulder height, and stagger the feet (one foot in front of the other). The front foot should be approximately 12 inches from the wall. With the front knee bent and the back knee straight, lean into the stretch (i.e. towards the wall) until a tightening is felt in the calf of the back leg, and then ease off. Repeat 10 times. (b) Now repeat this exercise but bring the back foot forward a little so that the back knee is slightly bent. Repeat the push-ups 10 times.
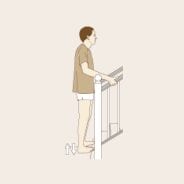
3) Stair stretches for Achilles tendon and plantar fascia
Holding the stair-rail for support, with legs slightly apart, position the feet so that both heels are off the end of the step. Lower the heels, keeping the knees straight, until a tightening is felt in the calf. Hold this position for 20–60 seconds and then raise the heels back to neutral. Repeat 6 times, at least twice a day.
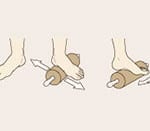
4) Dynamic stretches for plantar fascia
This involves rolling the arch of the foot over a rolling pin, a drink can or a water bottle etc, while either standing (holding the back of a chair for support) or sitting. Move the foot back and forth along the bottom of the foot. 8-10 minutes twice per day. At Sowell Podiatry we recommend a frozen water bottle most often. Return it to the freezer when done and it will be ready next treatment.
CLICK HERE TO PRINT THIS GUIDE